Automatic Rain-Sensing Clothesline Using Arduino Nano
Have you ever left clothes outside to dry and rain suddenly spoiled them? In this project, I used my two days off to build an automatic rain-sensing clothesline using an Arduino Nano. This simple IoT project detects rain and pulls the clothesline using a servo motor, helping protect clothes from getting wet.
Components Required & Their Purpose:
# Arduino Nano – The brain of the project. It reads signals from the rain sensor and controls the servo motor based on the input.
# Rain Sensor Module – Detects rain. It sends a digital signal (LOW) when water touches its sensing plate.
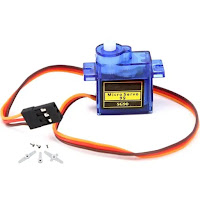
# Servo Motor (SG90) – Acts as the mechanical arm to pull or extend the clothesline. Controlled by PWM signals from Arduino.
# Breadboard – Used to connect components without soldering. Helpful for quick prototyping.
# Jumper Wires – Used to make all the electrical connections between Arduino, sensors, and motor.
# USB Cable – Connects the Arduino Nano to the computer for uploading code and powering the board during testing.
# Cardboard (70 cm x 50 cm) – Used to build the base and miniature model representing the clothesline system.
Optional Upgrades:
# LDR Module (for sunlight detection) – Detects the presence of light. Can be used to only extend the clothesline when there is sunlight.
# Buzzer or LED (alert system) – Provides audio or visual alerts when rain is detected.
# ESP8266 (for IoT notification feature) – Sends notifications to your smartphone using Wi-Fi.
Working Principle:
The rain sensor detects the presence of water on its surface. When rain is detected, it sends a signal to the Arduino, which then activates the servo motor. The servo motor is connected to a mini clothesline setup made of a horizontal rod that simulates pulling the clothes indoors. If optional components are used, such as an LDR, the system can also check for sunlight before deciding to extend the clothesline again.
Core Logic:
# Reads the rain sensor (digital or analog pin).
# Controls a servo motor to pull clothes in when it rains.
# Optionally, use an LDR sensor to check if it's daytime.
This Exact Setup:
1. Select the Correct Port
Go to Tools > Port > COM4 (Arduino Nano) ← select that one
2. Set the Correct Board & Processor
Tools > Board → Arduino Nano
Tools > Processor → ATmega328P (Old Bootloader) ← this is critical for most Nano clones
3. Upload the Code
Now try clicking the Upload button.
Basic Arduino Code Example (Rain sensor + Servo):
  #include <Servo.h>

const int rainSensorPin = 2;   // Digital pin for rain sensor
const int servoPin = 9;        // Servo control pin

Servo clothesServo;

void setup() {
  pinMode(rainSensorPin, INPUT);
  clothesServo.attach(servoPin);
  Serial.begin(9600);
}

void loop() {
  int rainDetected = digitalRead(rainSensorPin);

  if (rainDetected == LOW) {  // LOW means rain is detected on most modules
    Serial.println("Rain Detected! Pulling clothes in.");
    clothesServo.write(0);    // Rotate servo to retract clothesline
  } else {
    Serial.println("No Rain. Clothes stay outside.");
    clothesServo.write(90);   // Extend clothesline
  }

  delay(1000);  // Wait before next check
}
Note - If you are facing Driver issue like COM3, COM4 then simply you can go with this (https://sparks.gogo.co.nz/ch340.html) link and install and after installing boot your system.
Even make sure no Serial Monitor is open during upload.
How to Check:
# Look at the top-right corner of the Arduino IDE.
# If the Serial Monitor is open, you’ll see a window titled “Serial Monitor” (it looks like a terminal).
# Simply close that window by clicking the X at the top-right of it.
Shortcut:
You can also close it by clicking:
Tools > Serial Monitor (clicking it toggles it closed if it's open)
Why it matters:
The Serial Monitor uses the COM port, so if it’s open, uploading code will fail with errors like the one you got.
Try closing it and then upload your code again.
Confirm CH340 Driver Installed Correctly
Let’s double-check in Device Manager:
▶️ How to Open Device Manager:
Press Win + X → Select Device Manager
Expand Ports (COM & LPT)
You should see something like:
USB-SERIAL CH340 (COM3)
⚠️ If you see a yellow warning symbol, the driver didn't install correctly. Reinstall the CH340 driver and run it as administrator.
Correct Wiring Diagram (Text Version)
1. Rain Sensor Module (with digital output pin)
VCC → Nano 5V
GND → Nano GND
DO (Digital Output) → Nano D2
2. Servo Motor
Signal (Orange/Yellow wire) → Nano D3
VCC (Red) → Nano 5V
GND (Brown/Black) → Nano GND
Important: If the servo twitches or behaves oddly, use an external 5V power supply (like a battery pack or USB adapter) and connect its GND to Nano’s GND.
✅ Arduino Nano Pin Summary
# clothesServo.write(0); – This turns the servo to 0 degrees (you can change this angle if needed).
# clothesServo.write(90); – This keeps the servo in the default position.
Lets begin the test - For Live Visualization - CLICK HERE
Disclaimer
All tutorials are for informational and educational purposes only and have been made using our own routers, servers, websites and other vulnerable free resources. we do not contain any illegal activity. We believe that ethical hacking, information security and cyber security should be familiar subjects to anyone using digital information and computers. Hacking Truth is against misuse of the information and we strongly suggest against it. Please regard the word hacking as ethical hacking or penetration testing every time this word is used. We do not promote, encourage, support or excite any illegal activity or hacking.


